Monthly Archives: September 2013

over-watered-plants-with-root-rot

With this season's heavy rainfall totals, your over watered plants can suffer from root rot.  While root rot is a more common problem with house plants, it can also be very prevalent in landscape plants that are growing in water saturated soils.

The primary cause of root rot on plants is poor drainage and over watering, basically causing the plants roots to sit in water for long periods of time.  An occasional event of heavy rains or excess watering is not enough to create a condition of chronically over watered plants that can suffer from root rot.  As well, more established landscape plants can tolerate longer periods of over watering more than newly installed plants that have not been able to establish a mature root system.

A healthy root system is vital to the life of your landscape or potted plant.  Healthy roots need oxygen to disburse water and nutrients to the plant in order for it to thrive and grow.  An over watered plant can suffer from root rot in two basic ways:  the available oxygen is pushed out by water, and as the roots sit in water, they will get "wet feet" or rot, similar to us if our feet sat in a tub of water for days and days.  As the roots start to die, they are unable to uptake water and nutrients, and the plant will eventually die.

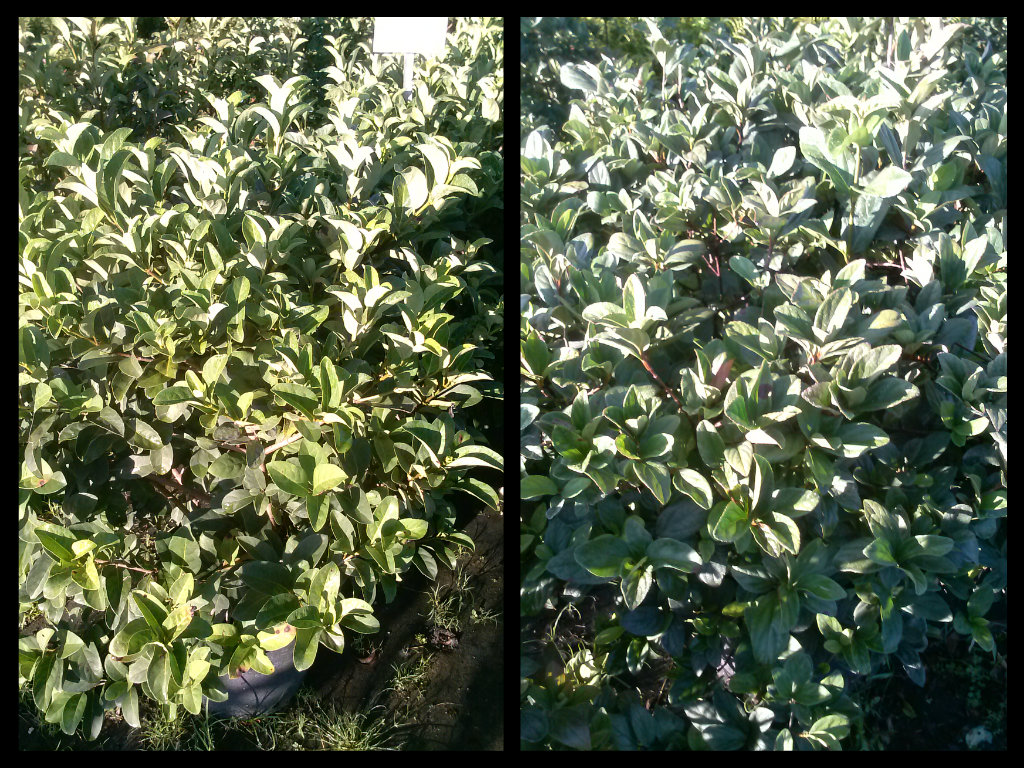
An early symptom of root rot on a plant is yellowing leaves, which indicates that the plant is unable to draw up nutrients through it's roots.  An even more definitive symptom of root rot on a plant is leaf wilt, even though the soil is damp or has moisture.  This would indicate that the roots are unable to draw up water, because they are compromised and diseased.   In some cases, if the plant has value, a soil and root sample can be submitted to a lab for a pathology report, which would identify the particular type of root rot, and allow for potential chemical fungicide treatment.

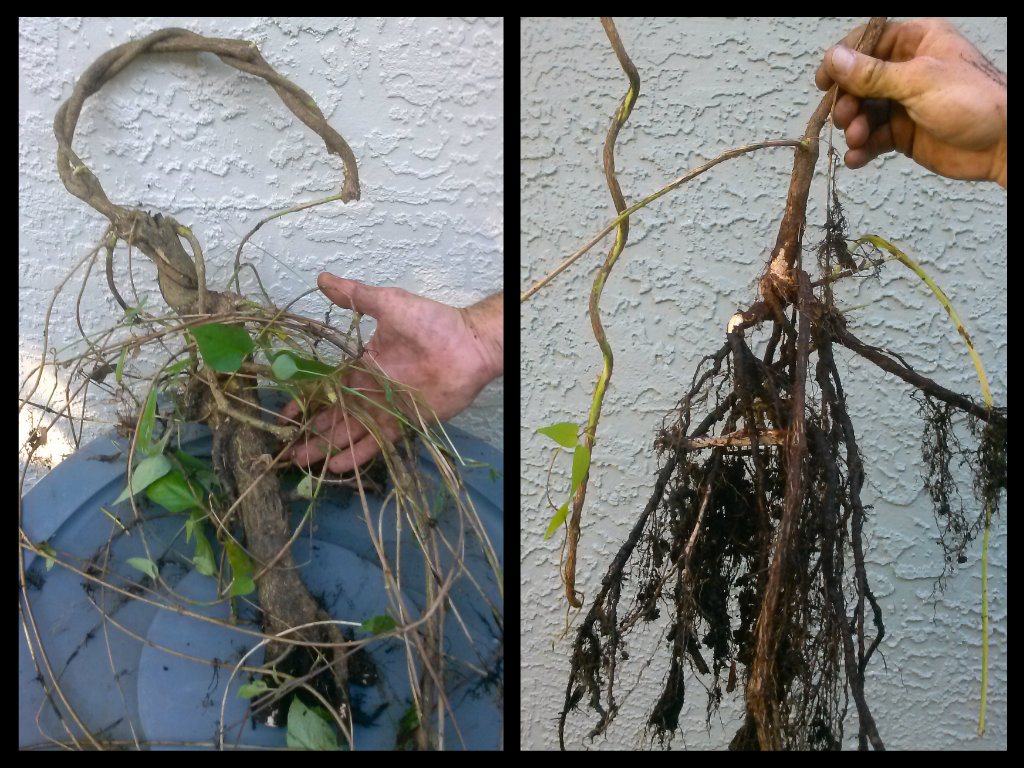
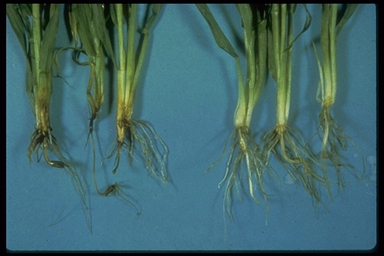
For most landscape and potted plants, though, a visual examination of the roots is sufficient to identify root rot.  A healthy root system is white and present, whereas a root dying from root rot is black, brown, or non-existent, or has necrotic lesions throughout (see image above).

Many times, root rot can be avoided in potted plants by following a few simple steps:  Always make sure that your potted plants are potted in a loose, well-draining soil; if you use a saucer to collect water under the pot, never allow water to "stand" in the saucer; water your potted plants only when the soil is dry to the touch about 1" under the surface; use plant "feet" if needed, to keep the bottom of the pot elevated; add rocks or broken pot shards to the bottom of the pot before soil is added to aid in drainage.

With your landscape plants, though, it can be a little more difficult to prevent root rot when Mother Nature is in charge of the watering.  You may not be able to avoid over watered plants, but you can use these general rules:  Only irrigate plants when the soil is dry 1" under the surface; select plants for typically damp areas that are more tolerant of "wet feet" conditions; install plants flush with the earth or slightly above, and do not mulch heavily against the crown of the plant; add gutters or drainage systems in areas that have chronically saturated soils; recognize the early symptoms of root rot and treat with a root fungicide when possible and feasible.

If you can recognize the symptoms of and the causes of over watered plants that can suffer from root rot, you can take steps to prevent it.

sliced-cucumbers-free1

This simple, yet delicious, recipe was submitted by our Johns Palms Landscaping client, Jeanne Todd:

  • 2 medium sized cucumbers, thinly sliced
  • 1/3 cup white vinegar
  • 1/3 cup water
  • 2 tablespoons sugar
  • 1/2 teaspoon salt
  • 1/8 teaspoon pepper

Refrigerate for 3 hours, and then enjoy as a fresh salad for lunch or dinner, or bring as a pot luck dish for any social event.  It is yummy!  Thank you, Jeanne!

blackgravel

Tampa is a city that is rich in landscaping, with many older homes having large and majestic  shade-producing trees.  While a healthy mature shade tree can reduce the air temperature in the shade by ten degrees, and can add thousands of dollars to the appraised value of your home, they can also create some unique challenges when trying to landscape around and under them.  Fortunately, there are number of landscape plants for shady areas that can bring color and interest to create a beautiful shade garden for your home.

Not all of our Tampa landscape plants are suited for shady areas, with many of them needing at least 4 hours of sunlight to thrive.  As well, some plants that will tolerate less than 4 hours sunlight will change form or color, and lose their intended appeal in your landscape design.  Here is a list of landscape plants for shady areas that I believe are real winners, with a few notes as needed:

Landscape Plants for Shady Areas, groundcovers:

  • Mondo Grass and Dwarf Mondo Grass
  • Foxtail Fern
  • Holly Fern
  • Minima Jasmine and Variegated Minima Jasmine
  • Agapanthus
  • Bromeliad, (many varieties)
  • Liriope, many varieties including Aztec Grass
  • Caladiums
  • Dwarf Oyster Plant

Landscape Plants for Shady Areas, specimens:

  • King Sago (fronds will stretch and elongate over time to an arching pattern)
  • Cardboard Palm (fronds will stretch and elongate over time)
  • Crinum Lily, white or red (red looses red color in shade)
  • Lady Palm (multiplies by running roots....can take over if unchecked)
  • Chinese Fan Palm (does grow to 20' eventually, but very slow growing)
  • Angel's Trumpet

Landscape Plants for Shady Areas, bushes and mid-sized plants:

  • Pinwheel Jasmine
  • Azalea, many varieties
  • Croton (colors do darken in deeper shade)
  • Variegated Arboricola
  • Iris, many varieties
  • Gardenia
  • Camellia
  • Bleeding Heart Vine
  • Nandina
  • Heliconia
  • Brunsfelsia
  • Ti Plant, many varieties
  • Ginger, many varieties
  • Cast Iron Plant
  • Philodendron

Any of the landscape plants listed above would be a wonderful addition to your shade garden, and will bring color, texture, and interest to a dark space.  Give them a try, and share you photos of your finished project!  We love photos!


Fenced raised vegetable garden with potting soil

If you a planning on growing your own fall vegetable garden in your Tampa landscape, now is the time to get ready.  You should by now know where you are going to place the vegetable garden, have removed the weeds, grass, and leaves to clear the area, and added your amended soil.  Amended soil can be compost or commercial potting soil, or a mix of both.  You can also add cow manure or other organic material, but it cannot be "hot" or fresh, as it will burn your vegetable seedlings.  As well, this would be a good time to add fertilizer to the vegetable garden in preparation to start planting.

To have the best results with your fall vegetable garden, you should only plant vegetables that are in season.  By doing so, you will have less problems with disease and insects, and be rewarded with happier plants that will thrive.  Follow this general guide as for what to plant in your fall vegetable garden, with recommended planting months for Tampa:

  • Mustard (Sept-March)
  • Onions, bulbing (Sept-Dec)
  • Green Onions, bunching (Aug-March)
  • English Peas (Sept-March)
  • Radish (Sept-March)
  • Spinach (Oct-Nov)
  • Strawberry (Oct-Nov)
  • Tomatoes (Sept)
  • Turnips (Sept-Nov)
  • Beets (Oct-March)
  • Broccoli (Aug-Jan)
  • Cabbage (Sept-Jan)
  • Carrots (Oct-March)
  • Cauliflower (Oct-Jan)
  • Chinese Cabbage, Bok Choy (Oct-Jan)
  • Collards (Aug-March)
  • Kale (Sept-Jan)
  • Lettuce (Sept-March)

While harvest times vary from plant to plant, your average time from seedling size to produce is 60 days on average.  And, as you can see, some of these fall vegetables have a long planting season, so you can plant multiple times throughout the fall and winter.

So, where do you find some of these seedlings?  You may find some of the more common garden vegetables at places like Lowe's and Home Depot, but I have the most luck on all of them at places like Ace Hardware on Gunn Highway and at feed stores like Shell's Feed on North Nebraska Ave.

So, let's get growing that fall vegetable garden!  And, share you success stories and photos, and maybe a favorite recipe of your bounty!


Too many of you may feel that you have a "black thumb", and become discouraged with your landscaping and gardening efforts.  I'm here to tell you that you don't have a black thumb, and even those of us that have been at it for years, will feel the same way from time to time.   True enough, though, there is nothing worse than a depressed gardener, when even your plants die.....

Have heart, as this year's rainy season even has me replacing lots of root-rotted plants!  So maybe it's not a black thumb after-all, as even this quote confirms:

"There is no gardening without humility.  Nature is constantly sending even it's oldest scholars to the bottom of the class for some egregious blunder."  ~Alfred Austin

Stink Vine Invasive Landscape Weed

Stink Vine (Paederia foetida) is an invasive weed in Florida landscapes, and it can be extremely difficult to control.  It is a fast growing, aggressive vine that both crawls across the ground and climbs into trees and bushes, eventually blanketing all with it's dense root system, tendrils and foliage.

Stink Vine (also called Skunk Vine) was introduced to Florida from Asia in the late 1800's as a potential fiber crop.  It quickly adapted to our climate, and within 100 years of it's introduction to our state, it was named to the Florida Noxious Weed List.  As if it's growth habit wasn't bad enough, it emits a pungent odor when crushed, hence it's fitting name of Stink Vine, or Skunk Vine.

Stink Vine is easy to propagate, starting with a simple seed dispersed by wind or bird, or even a small cutting left behind when trying to remove it.  Once a seedling is rooted, It crawls across the ground with little notice, entwines itself on the trunks of bushes, A/C units, gas lines, or anything, and before you know it, it is everywhere.  Even in your grass.  As it crawls across the ground, it roots into the soil at it's nodes, which then spider out to create new vines, of which they then repeat the process over and over again.  If left unchecked, Stink Vine will eventually choke the life out of your landscape plants by covering the desired foliage and inhibiting photosynthesis.

To control it, you must start with physical control....pulling it and tracing the vines back to the rooted tendrils and "mother plants".  Fortunately, the thin baby vines are white and easy to see, and they are rather tough, so they don't snap easily when pulled.  When you track them back to the source, you might find a larger trunk like the one in the above picture on the left.  If you can pull it, or dig it up with a hand shovel, try to get as many roots as possible, such as the photo on the right.  Once you are confident that you have pulled all of the runners, you can take a breather.  And, then wait for them to grow back, for your second wave of attack.

It won't take long for the new baby seedlings to emerge from the mulch or soil. It is at that point that you need to spray them with a weed killer that kills to the root.  Most systemic weed killers work by applying the herbicide to the leaf of the plant, so it won't serve any purpose to spray the tendrils or soil.  During our growing season of May-October, you may have to spray the weed killer several times, while watching for any runners that escape your attention and grow.  Those you will have to pull.

With a thorough initial clean up and removal of the Stink Vine, and follow up applications of a weed killer, you can control this insidious weed.  But, it does take diligence and perseverance!


Roses and Society Garlic

While you probably have never given it much thought, there are many common landscape plants that are edible, and some of them may already be in your garden!  So, why would you want to know that?  Because edible landscape plants can add a creative garnish to an ordinary meal, a tasty flavor to any dish, a zing when added to beverages, and a culinary fragrance to marinades.....the list is endless!  As a bonus, they make your landscape more unique, as well as beautiful!

Before you dive in to cooking with edible flowers and landscape plants, be certain that you know which ones are edible and which ones are not, and which plant parts to use.  With most flowers, it is the petal only, and not the leaves and stems.  With other plants, it is the seed or fruit, and with still others, it is the roots.

Here is a short list of some common landscape plants that are edible:

  • Roses (petals)
  • Society Garlic (petals and leaves)
  • Lemon Grass (leaves)
  • Rosemary (leaves and petal)
  • Pansies (petals)
  • Hibiscus (petals)
  • Pindo Palm (seeds/fruit)
  • Podocarpus (seeds/fruit/female plant)
  • Coco Plum (seeds/fruit)
  • Seagrape (seeds/fruit)
  • Marigold (petals)
  • Daylily (petal)
  • Honeysuckle (petal)
  • Pineapple Guava Feijoa (fruit)
  • Surinam Cherry (fruit)

So, be bold, and give some of these edible landscape plants a try in your next recipe!  And, if you find that using these edible landscape plants in the kitchen is not to your liking, you will still have a beautiful landscape garden!

viburnum

Viburnum is a family of plants that has many varieties in it.  They are plants that are shrub or hedge like in form, and are generally drought tolerant and durable.  Two of the most commonly used Viburnum in our Tampa landscapes are Sweet Viburnum (left in above photo) and Leatherleaf Viburnum (on the right side of the above photo), and those are the two that I will focus on today.  While they are very similar in appearance and care, they have vastly different uses in the landscape.

Both of these types of Viburnum are similar in many ways:  They have a rounded growth habit, with dense, full foliage that has branches and leaves all the way to the ground.  They both have dark green leaves and make very attractive hedges when trimmed.  They are drought tolerant once established, have no particular pest problems, are adaptable to many soil and sunlight planting conditions, and are weather hardy.

On closer examination, though, you will see the first difference between the two Viburnums:  the leaf.  While both leaves are the same size, the Leatherleaf Viburnum's leaf is a darker green, and has a more crinkled or "leathery" appearance, hence it's common name of Leatherleaf.   From a distance, though, it is difficult to determine which hedge is which, when mature and  trimmed at a height of 4'.  You can see the subtle leaf color difference in the side by side photo above, and you might agree with me that it is indeed subtle.

The second, and most important, difference between these two Viburnums is their ultimate growth height, with the Sweet Viburnum growing to 20' tall, and by contrast, the Leatherleaf Viburnum coming in at a mere 6' height.  Now you can see why it is important to understand the differences so that you can make an informed decision as to which one to pick for your landscape.  Let's look at them individually, given that you will spend many years with either one or both in your home landscape.

The Sweet Viburnum (Viburnum odoratissimum) is fast growing and ideal for privacy hedges, which is one of the reasons that it is so popular.  A typical 3 gallon hedge can be installed and within 2-3 years grow to a nice privacy barrier or living fence.  Most plants are easy to maintain in the first several years after installation, and Sweet Viburnum is no exception.  It is usually in year 4 or 5, though, that you might notice that this plant loves to grow, and to keep it as a hedge at a designated height of 4-6' requires frequent trimming during the growing season, which is almost monthly.  This is not the ideal shrub at your home's front entrance if you want something to stay at window-sill height.  That is where the Leatherleaf Viburnum comes in:

Leatherleaf Viburnum (Viburnum suspensum) is not as fast growing as the Sweet Viburnum, but it can also be a nice hedge in 2-3 years, albeit a shorter growing one.  This one is the ideal choice for a front yard landscaping background plant (also called foundation plant), around an A/C unit or pool screen, or anywhere that you might need a bush or hedge that maxes out in height to 6', and can be maintained at a height of 4'.  While it might take a little longer to get there than the Sweet Viburnum, you will only have to trim this hedge about 2-3 times a year.  That is important if you are going to spend 20 years + with a plant!

Picking the right plant for the right location is important, as you can see.  Both of these Viburnums are extremely forgiving of site conditions and maintenance levels, so either could be used almost interchangeably if it were not for their growth heights.  That is a plant characteristic that is too important to overlook, if you want a little more freedom from your yard work.  You've heard the old adage "right plant, right place" for success in gardening, right?    In this case, size is an important consideration in that adage because if you select the right plant (in growth habit) and right place (in room to grow for desired effect), you will be successful in your landscape gardening, and will be a lot happier with your plants.


In anticipation of preparing my plot for a fall season vegetable garden, I thought that this Quote of The Day was most appropriate:

"Gardening is cheaper than therapy and you get tomatoes" ~ Author Unknown

Hah!  That's truer than we will ever know!

I love a good cold salad with a BBQ, and this is one of my favorites!  It's so simple, and it is simply delicious.....

-1 very large tasty tomato, or a few smaller ones, diced to a size slightly larger than a pea

-1 can of sweet peas, or cooked frozen peas, similar amount (I prefer the canned, but mostly it is a half tomato, half peas recipe)

-3 tablespoons of mayonnaise

-salt and pepper to taste

Chill before serving.  It's easy, peasy, and a solid take to for any BBQ,  pot luck, church event, bake sale, etc, a winner all-around.  I credit Martha Graham for the recipe.  Thanks, Martha!