Landscape Maintenance Tips

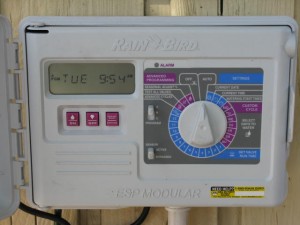
rainbirdTimer

Programming your Rainbird irrigation controller is easier than you think.  While Rainbird makes it super simple, many others do, too.  It just takes a little understanding of some controller and irrigation basics, and the rest falls into place.  So, here we go with the basics, before we go to programming:

  • Every clock has a current date and time stamp.  That needs to be set for year, month, day, and time (AM vs. PM)
  • An installed irrigation system is set up in multiple zones, as you cannot water everything at once for lack of water pressure.  If you remove the bottom panel of your irrigation controller, you will see one wire (usually white or green) that goes to common, and the other colors go to numbered ports.  Each wire goes to a zone, and that will tell you how many zones you have, by the number of connected wires to zone numbers.  Each zone wire and numbered zone operates a specific zone on the face of the controller, and in the yard.  A zone is a section of the yard that will be irrigated at one time, and will be rotated by a section at a time by the programming of the controller that you will program.  Some home landscapes only have 2-4 zones, whereas large properties can have twelve or more, and your wiring panel will tell you how many zones you have to be programmed.  The number on the dial of the face of the controller is not indicative of the number of zones that you have, and you can only be certain by looking inside the controller to see what is wired up.  With controllers under 6 zones, you remove the bottom door panel, and with larger timers, you open it on the right side, like a door.  Both generally open with no tools needed, just by sliding or hand prying.
  • Some Rainbird controllers have a slide bar at the bottom right side, with numbers like 2, 3, 5 and "c".  If you slide the bar to the numbers, it will automatically water every 2 days, 3 days, or every 5 days, depending upon where you moved the slide bar to.  You should keep the slide bar at "c" which is for custom programming, which is what we will be doing for Tampa landscapes, and water restrictions (although you could use this cool feature if you are on reclaimed water)
  • Rainbird controllers (and most others) have at least two programs that can run simultaneously  On smaller controllers, the A/B program functions are a push button at the top right, next to the "on/off" or "up/down" arrow buttons.  On larger controllers, it is a slide bar, just left of the dial, that notes "A,B, or C".  These are your programs.  If you have an "A/B" program, you can run two programs.  If you have more, you can run more programs, A,B,C,D etc.  This is not the same as zones, as zones are the sections of the yard to be watered.  Programs are like an alarm clock, that you can program to wake you up multiple times in one day.   Programs are how you tell the zones to water.  To determine what program you are on when programming, look at the display window for a very small letter "A,B,C" etc.  It is miniscule, but critical, and it will tell you what program that you are programming.
  • On the Rainbird dial, there is a feature that either says "seasonal adjustment" or "water budget".  This feature allows you to adjust the amount of watering without changing the programming.  It should be set at 100%, which means that if you program each zone for 20 minutes, it waters for 20 minutes.  And, further, if it is the rainy season and you reduce the water budget to 50%, it will water 50% of what you programed, or 10 minutes instead of 20.  And, in the hot, dry spring, an increase of water budget to 150% increases the 20 minutes to 30 minutes.
  • Days of the week on the face of the Rainbird dial allows you to water certain days of the week.  With Tampa's water restrictions, you are only allowed to water on certain days, and this part on the dial allows you to program which days your irrigation will run.
  • The individual numbers on the dial are the zones that you have, and programming them allows you to tell the Rainbird controller how many minutes you will run each zone, which means, how many minutes will you run the sprinklers in each area of your yard, as they irrigate per section.  Plant beds may need less watering, as do sides of the house, while the front yard, full sun areas with grass need more.  This function allows you to determine how much water each section (zone) needs, and you can adjust it as needed, by changing the programming of the controller.  For example, maybe the full sun back yard needs 30 minutes for grass, but the sides only 8 minutes, because it is shaded and dank.
  • Each program has multiple start times.  That means that you can have 3-4 start times for program "A", and 3-4 start times for programs "B', and so on.  Start time is when you will start the watering for the zones that you have selected.  You should realize that if you have a smaller controller, with only "A and B" programs, you can have 3 start times for each A or B program.......that has the potential for 6 start times a day.  With larger controllers, there are usually 4 start times, and 3 programs, so that has the potential for 12 start times a day.  This is a very misunderstood feature on Rainbird controllers, and care must be taken, otherwise you could potentially be watering for 8 hours a day.  If you only want one program running, the other programs must be turned off, otherwise all programs will run, simultaneously, beyond your notice.
  • A program will not accept midnight as a start time, and that is the default to shut off a program from running.  Of course, the additional ways to stop a program are to shut off days of the week, or to shut off minutes per zone.  A zone needs all three to run, so if you have no start time, no days to water, and no minutes to water, the program will not run.
  • The last feature too discuss on the Rainbird controller is the advance button, usually on the top right corner (ADV).  This is how you test your system, or advance to a particular zone.  When the dial is in the "auto" position, if you press the advance button, it will start the program, and will re-set itself to the next time to run by itself.    This is also how you test the system on smaller controllers, and you can press the advance button to the next zone to run, or the next zone to run, or the next, etc.  The display screen will not only tell you what PROGRAM you are running, it will also tell you what zone, and how many minutes the zone is set to run for.  If you are on the wrong program, press the "A/B" button to change programs, or use the slide bar on larger controllers.

Once you understand the controller basics, the rest is easy to finish programming your Rainbird controller.  Move the dial to what needs to be programmed, and use the "up/down" arrows (top right corner) to make the changes.  On days of the week, for example, turn the dial to Monday, and use up/down to turn Monday off or on.  Move the dial to Zone 1, front yard full sun, and use the up/down arrows to adjust the minutes for the zone to run.  Pay attention to whether you are on program "A" or "B", as both are programs and you may inadvertently program the wrong one.  As for some adjustments such as time/date, you may have to use the advance button (usually used to start the programs), to move from one field to the next, to advance from year, to month, to day, to time, and then you still use the up/down arrows to make changes.  On larger Rainbird controllers, you will also have to use the advance button to check start times  per program, and then also use the up/down button to default a zeroed out start time to midnight.

I have two notes, and the first being that when I look at a controller, the first things that I check for are "water budget/Seasonal adjustment" and run times per program, as I find those to be the most common errors.  For example, a month ago,  a client not only had programming at 70% water budget on program "A", but it was running two times, overlapping by 1/2 an hour.  Worse, though, she had 3 start times running  on program "B'", and some of them were overlapping, too.  In this example, she had 5 start times, on two programs, and was mystified, and just saw water everywhere, every day, at all hours.  Who knows how that happened, but it did.  My guess is that multiple people programmed her controller over time, and did not pay attention to what program they were on, and how many start times were set.

Having multiple irrigation programs with multiple start times can be beneficial to your landscape, if you understand how to use them.  As an everyday irrigation strategy for your landscape, everything should be programmed on program "A"  for a typical September day.   With that, you either lower or raise your "water budget/seasonal adjustment" feature per the weather conditions.  Program "B' should be used for drip irrigation, or vegetable gardens, or anything else that needs more than normal watering, a per water restriction guidelines.  Program "B" or  even "C,D", can also be used for new plantings or sod replacement, or anything else that needs temporary additional watering, without watering all of the property.

Programming your Rainbird irrigation controller properly can be pretty awesome:  it not only allows you to have dominion over your landscape and water bill,  but it is sort of like knowing how to program a smart phone, when no one else does.

Water is an important resource for all of us as a community, as is your beautiful landscape.    Home budgets are tight, and qualified, knowledgeable advice is harder to find than ever.  We want for your plants to live, as well as help you save money on your water bill.  With that, Johns Palms Landscaping is offering to program your irrigation controller for free, as well as to teach you how to do it, at your home.  It's our way of saying thank you for your support of our 27 years in business, as well as paying it forward for the next 27 years, even if you have never been one of our customers in the past.

Call Johns Palms Landscaping at 813-493-3373, to schedule your appointment, today.

Let's get to it, and start fixing those bothersome issues about your home and landscape.  This one is an easy fix, and it's free!


deer-damage-evidence

As more and more homes are built in communities that feature large tracts of grasslands and woodlands, it gives us an opportunity to live close to nature and enjoy the abundant wildlife that lives amongst us.  We can observe birds, rabbits, deer, and other wild animals in a natural setting, right outside of our patio, doors, and windows.  While enjoyable to watch, some of those animals can create havoc to our landscape, and pose challenges to even the most seasoned gardener.  Deer are one of those animals that love our landscape plants even more than we love to watch them, and can thwart almost any attempt to deter them.  Today, I will explore some of the physical or chemical barriers that are available, but will primarily focus on deer resistant plants for Tampa landscapes.

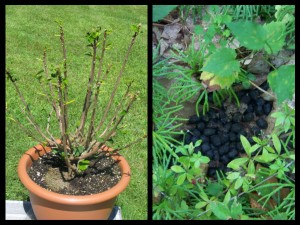
It's no surprise that deer have become a major pest to our landscapes and gardens.  They have less predators than ever before, which allows for increased populations.  As well, as we build closer and closer to their habitats, they become less intimated by human presence.   Often, we don't realize that we have a deer problem as they may only be present at late dusk and early dawn.  However, if you have damage to your plants, like the Hibiscus in the above photo, or see droppings similar to the photo on the right, you have a deer problem.  Some of their favorite plants are Roses, Indian Hawthorn, and Hibiscus, and once they know that you have them in your landscape, they will make regular feeding trips.  The easiest way to tell for certain is if the leaves are stripped off the top and sides of the plants, exposing only the stems.

So, if you have determined that you do have deer eating your landscape plants, you can try a few measures to deter them.  Small fencing barriers may be effective in some locations, while coyote urine or deer repellant may work in dry areas that receive little or no irrigation or rainfall.   Another option is to relocate your favorite plants close to the home's front entrance, but even that may not prevent the bolder ones from venturing closer to human foot traffic.

If you have tried barriers, scents and repellants, and relocating plants to "safe zones", and nothing has worked, you may just have to consider landscaping with deer resistant plants.  There are many wonderful deer resistant plants for Tampa landscapes, and with a little knowledge, you can create a beautiful landscape that will discourage the deer from making a nightly feeding trip to your home.  While deer will eat just about anything, they will mostly leave these plants alone, after an initial taste test:

  • Pinwheel Jasmine
  • Crinum Lily
  • Junipers, all varieties
  • Holly, all varieties
  • Pittosporum
  • Podocarpus
  • Society Garlic
  • Ligustrum
  • Viburnum, all varieties
  • Bird of Paradise
  • Agave
  • Bromeliads
  • Crossandra
  • Penta
  • Iris
  • Most grasses, such as Pampas, Fountain, Muhly, Adagio, Fakahatchee
  • Jatropha
  • Ixora
  • Gold Mound and Duranta
  • Bamboo
  • Palms
  • Allamanda
  • Azalea
  • Bottlebrush
  • Boxwood
  • Bush Daisy
  • Coontie, King Sago, and Cardboard palms
  • Downy Jasmine
  • Shiny Jasmine
  • Dwarf Firebush
  • Lantana
  • Nandina
  • Oleander
  • Plumbago
  • Philodendron, all varieties
  • Oyster plant
  • Mexican Petunia and Dwarf Mexican Petunia

This list is by no means complete, but you can always call our office if you have any questions about a particular plant, or you are welcome to add to this list based on your experience.  As a fail safe method, I will install a sample plant in a yard that I know has regular deer activity.  While it might be nibbled on, the deer may only be testing it.  If it is mostly left alone over a few weeks, than I feel comfortable using it in my design.  As always, have fun and experiment......that's half the joy of gardening!

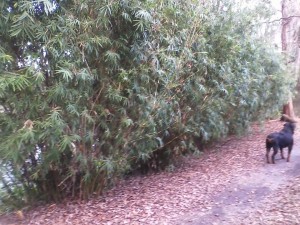
Dwarf Bamboo; Golden Goddess Bamboo

There may be many reasons why you might want to add a privacy barrier to your Tampa landscape.  Perhaps you would simply like some privacy!  Or, you might need one as a sound barrier next to a noisy street, or to block out a street light that disturbs your sleep.  Maybe the local teenagers cut through your yard on their way to the park, or your neighbors have an unkempt yard that offends your view.  No matter the reason, a privacy barrier can be one of the best landscape investments that you can make.

When selecting the types of plants that you might like to use, you need to keep a few things in mind:  it should be a plant that is hardy and permanent; you need to understand the maintenance requirements and preferred planting site of the selected plant(s); and you must make sure that you have the space for a privacy barrier.

Primarily, you want to make sure that the privacy barrier will live for many years.  Given it's function in the landscape, if the plant that your select is prone to freeze damage, you have the potential to lose your privacy hedge in any given winter.  A good example of this would be using plants like Bougainvillea or Hibiscus, that could potentially be killed or freeze burned to the ground, and you will have to wait many years for them to grow back.  If you would still like to use plants such as these, consider adding a few so that you get the look that you like, but do not rely on them as a permanent plant.

Secondly, make sure that understand the growth habit of your desired plant(s) for the privacy barrier.  Some plants like Podocarpus can be trimmed as a more narrow and upright hedge, but plants like Dwarf Bamboo will need plenty of side room to grow.  Also, while some plants are versatile in their sunlight and soil preferences, others may not be.  One example is Ligustrum, which prefers sunlight and well-drained soil, but will be thinned out in too much shade or may get root rot in soils that are too moist.

Lastly, make sure that you truly understand the ultimate growth habit of the privacy barrier plants that you select.  If you can determine the height of the privacy barrier that you desire, you can try to select plants that will ultimately stop growing at near that preferred height.  Otherwise, you should at least try to understand the maintenance level that it might take to keep a plant at 10' when it really wants to grow to 20'.  Ask yourself how many times a year will I have to trim it, and does that schedule mesh with what I willing to do in my landscape?

Fortunately, there are many wonderful plants that you can select from to create your privacy barrier.   While some plants grow very slowly (like Chinese Fan Palm), others grow very quickly (such as Sweet Viburnum).  Depending upon your budget and the urgency of the privacy barrier, you may be able to buy smaller plants (3 or 7 gallon size) and let them grow.  Conversely, if you need an instant privacy barrier, you will have to purchase plants that are several years old, and have a much higher price tag.

Any of these plants will work for your Tampa landscapes, just be sure to understand their ultimate growth height and spread, preferred planting conditions, and typical maintenance schedule:

  • Dwarf Bamboo, varieties such as Golden Goddess, Fern Leaf, and Alphonse Karr
  • Chinese Fan Palm
  • Areca Palm
  • Roebellini Palm, in select situations due to limited growth height
  • White Bird of Paradise
  • Fishtail Palm
  • Bottlebrush tree, single trunk or multi-stem
  • Podocarpus
  • Sweet Viburnum (Viburnum odoratissimum)
  • Red Cedar
  • Eleocarpus
  • Ligustrum tree
  • Holly, many varieties

Any of these plants would make a welcome addition to your landscape, either in a grouping or hedge,  or as a solitary plant.  As well, many of them can be mixed together in a pleasingly cohesive design that can create a privacy barrier that doesn't look like a "wall".  As always, half of the fun of landscaping is experimenting, so if you do your homework, and understand the nature of the selected plant(s), you will be amply rewarded!

Let's get growing, Folks!  You privacy barrier is awaiting!

Donell


snail-damage

Slugs and snails can be a significant pest problem on many varieties of landscape and vegetable plants in Florida.  As they mostly feed at night, they can be difficult to detect, but the damage that they leave behind should be evidence enough.  While some other insects, such as caterpillars and grasshoppers, leave similar damage patterns, those critters can usually been seen during the day making the pest diagnosis easier.

So, how can you be sure that the damage to your plants is being caused by slugs and snails?  You can set a trap for them!  Slugs and snails like to spend their daylight hours in a cool, dank place, so you can make that easier for them by creating a place for them to go to!  Position a large flat rock or similar type of object at the base of the plants that are being fed upon, and then check under it daily, in the cool of the morning.  You will see them resting under the rock, thereby confirming that you have a slug or snail problem.  As well, you can sometimes see their slime trails on concrete or leaf surfaces, which is also clear evidence.

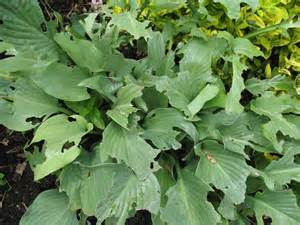
So, once you have identified that you have a slug and snail problem, you will need to find a way to get rid of them.   Slugs and snails can be difficult to eradicate, but with determination and persistence, you can control them.  One way, or course, is to apply a commercial slug and snail bait product available at garden centers, but it can be costly and may have to be applied often, depending upon the weather.   Another way to eliminate the problem is to change out your landscape and garden plants to a variety that is less favorable to them, as they do have their favorite host plants such as Hosta and Peace Lily.

Fortunately, there are some other options to control slugs and snails, that are not only organic, but also fun and clever.  Any of these following methods will work, but you may want to incorporate all of them in your pest control program:

  • Remember the flat rock that we used earlier to help identify the presence of slugs and snails?  Add a few more of those to the garden and then check under them daily, preferably in the morning.  Physically remove the snails, bag them up, and throw them away!
  • Beer.  That's right, slugs and snails love beer!  Dig a shallow hole in the ground near the plants that are being fed upon, and place an empty plastic butter tub or similar in the hole, so that the container is flush with the surrounding soil.  Fill the tub half way with beer, and then wait.  Slugs and snails love beer, and will fall into the tub at night and drown.  Empty the tub every few days as needed, and fill again.   Continue repeating this program until the population is eventually reduced, when you aren't trapping any more  pests.
  • Add copper banding to the base of you plants.  Slugs and snails hate copper, as it is believed that it gives them an electrical charge.  This method is more practical as a physical barrier at the base of a plant, or as a copper strip added to the lip of a potted plant, or similar concept.   As well, you may have heard that you can use pennies, but that is not true today, as pennies no longer have copper added to them.

By now, you may have realized that controlling slugs and snails in your garden may not be easy, but with a plan and some persistence, your efforts will pay off.  By using these organic pest control methods in a mufti-faceted program, you will eventually be able to enjoy your favorite plants, free of slug and snail damage!

So, let's get slug and snail hunting folks!

Donell


community-landscape-tampa

Adding annual flowers to your landscape is a great way to bring fabulous bursts of color to your garden, even though they are usually temporary.  Annuals are seasonal plants, that are sometimes called bedding plants, and they are narrowly defined as plants that grow, and  reproduce (which means to flower) and die, with a one year time frame.  In the landscape world, then, when they are flowering, they are at the peak of their life when you buy them, and will only live for a few more months, in your garden.   Most annual plants are designed to live for 3 or 4 months after purchase, with the expectation that they will be replaced out, seasonally, with another annual of a different type, that prefers the new season.    With that in mind, adding annuals to your landscape can bring a wonderful pop of color, seasonally, with an expected rotation of changing them out 3-4 times a year, given their limited lifespan and preferred season.

Adding annuals to your landscape can bring  a wonderful and changing variation to the look of your landscape, but it is not for everyone.  While some annuals can be low maintenance and seem to free-seed and live on their own, others can require dead-heading of old seed pods and pinching back when they get leggy and spindly.  More so, most annuals have a preferred season, and do require a rotational change-out.  However, if you are willing to do the work, no matter how large or small the designated area for planting, you will rarely find the colors to add to your landscape, that annuals can bring.  They bring vibrant colors in a big way on a small scale, that no other plant can do!

If you do decide to add annuals to your landscape, here are a few tips:

  • Annuals always will need a bed of fresh potting soil to be planted in.  Do not plant them in regular Florida soils and expect success.
  • If you want to mulch your annual bed, do not mulch the annual.  Leave a 1" clearance around the stem of annuals, and only lightly mulch the soil bed, as most annuals are very sensitive to materials around their stems and can die from root rot or too-deeply planting.
  • Know the preferred season for your annuals.  Many nurseries and almost all box stores sell annuals (and vegetables) out of season.   A smart man told me recently that he simply watches for what annuals are planted at the subdivision entrances and  commercial buildings, and he follows suit.  He is absolutely right and this is an awesome way to get it right the first time.  The pros are not guessing about the right season/ right annual.
  • Some annuals are more prone to insect and fungal problems, so if you opt to select those plants that are, stay vigilant with your pest control, for ultimate success.
  • Lastly, as always, have fun with your landscaping and don't give up!   I don't believe in black thumbs, and some plants just have rules or natures that have to be followed.  Follow them! and you will be successful.

As a note, and as a landscaper, I do not install many annual beds, but when I do, this is my philosophy:

  • Keep the bed small, within 1-2 trays of plants, always in a bed of potting soil
  • I prefer a 3 time a year rotation:  Begonias in the spring, as they can handle the heat, but hate the rain; Coleus in the mid-summer as they love the rain and the heat;   Petunias in the winter, as they can handle some heat but love the cold.

There is so much to know about gardening and landscaping, and IFAS is the source.  For more information about annuals, and seasonal tables, click on this link:

http://edis.ifas.ufl.edu/mg319

Let's get gardening, Folks!

Donell

carolina-yellow-jasmine

Spring can be elusive, especially in Florida where the sun is shining, birds are singing and plants are blooming, while snow is falling in record numbers once again, in the north.   So, when and how do we determine if Spring is here?  When can we start our spring cleaning of our landscape and gardens?  Well, I would say that the time is now, and I will tell you why I think that and what I look for.

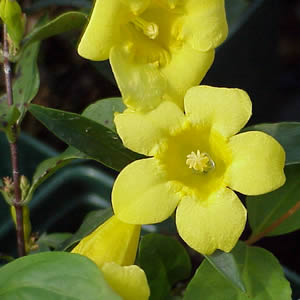
Firstly, I look for blooms on Day Lily and Carolina Yellow Jasmine.  Day Lily are mostly an "iffy" plant for Tampa, but when planted in their perfect place, they are one of the earliest bloomers, and can provide a welcome display of fabulous colors, for those weary of gray days, typical of Florida winters.  Not to be outdone, Carolina Yellow Jasmine is another one of those plants that welcome in the spring, with small yet fragrant flowers that can surprise you with it's deceptively small "rest of the year" presence, both with it's mass of flowers and it's subtle perfume scent that carries through the dense evening nights.  It's a true "wallflower", until Spring.  While many plants will bloom throughout a mild winter, these two plants are a true harbinger of Spring.

Secondly, I watch the trees, particularly the large hardwood shade trees.  While some large trees like Sycamore and Maple drop their leaves early, Oaks take a little longer.  With that said, Live Oaks seem to be the most stubborn, waiting to the very last minute to drop the rest of their leaves, even to the point that Maples have already seeded and begun new leaf growth.  With the Oak's last leaf drop, they will soon seed (called catkins), and drop them within weeks, which can create as much of a mess as the leaf drop itself.

Lastly, I watch the moon phases and trust my instinct, after 25 years of experience.  Old timers say that there will be no frost after the full moon in February, and I would say that prediction has held true 90% of the time.  Of course, it's the other 10% of the time that is the concern.

Today, I see Carolina Yellow Jasmine blooming, and Day Lily with buds.  The Maples have seeded already, and are putting on new leaves.  The Oaks have dropped most of their leaves, and some are even flushing with new leaves.  The majority of Live Oaks, though, have not seeded and dropped their catkins, but I do believe that will happen soon, and it will be a small production yield this year, not near as bad as last year.

With that, Spring is very near, and it is time to make your plans.  To get the full benefit of what a Spring garden can bring to your home, now is the time to prepare to take action, with regards to Spring cleaning of your landscape, seasonal plantings, new plantings, vegetable and herb gardening, as well as fertilizing and pest control.

In the next few days, I will post a guide as to what to do and how to get started.....Don't let Spring pass you by, with all of it's glorious wonder.  Let's get growing, Folks!

Donell

frozen-orangre

With our first serious cold snap of the season approaching, you may be wondering how you can protect your Tampa landscape from freeze and frost damage.  While it is unlikely that your tender and delicate plants will emerge unscathed, there are some things that you can do to minimize the damage.  Before we explore ways to protect your Tampa landscape, let's discuss the potential damage to plants from either freeze or frost.

Frost is a common weather event  in a typical winter in Tampa, and usually will occur several times in the months of January and February.  While we may occasionally have a mild winter without frost, it should be considered a rarity.  As a general rule, frost will not settle under the canopy of a large shade tree, in most areas around a structure such as a house, or on windy nights.  One easy way for you to determine the frost prone areas of your landscape is to observe where the frost is, when we do have frost.   Once you have observed the "frost zone", it will give you a better idea of what areas need to be addressed for protection.  As well, this information may come in handy in the future, should you decide to re-landscape some areas with cold hardy plants.

Frost damages cold-sensitive plants by settling on their leaves, new growth, and flowers, while plants that are cold hardy will not be affected.  Frost will generally not kill a plant, although it may cause leaf drop and die back that can take months or even years to recover from.  I find that plants like Hibiscus will rebound quickly from frost damage, whereas plants like Croton can take several months or even years.

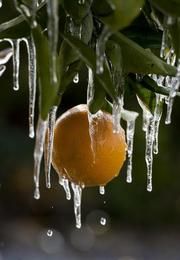
Freeze is an uncommon weather event in Tampa, but it does occur often enough to warrant attention.  While we may occasionally experience temperatures at 32 degrees, it is temperatures at or below 32 degrees for more than 4 hours that should be of concern.  With extended hours of freeze, all cold-sensitive plants can be affected, including those that are generally not affected by frost (your frost-free zones).  If an area of your landscape is capable of reaching temperatures at or below freezing for more than 4 hours, it is possible that your cold-sensitive plants will be affected.  Freeze can kill plants at their leaf, stem, and root, and can be quite devastating to a landscape that is not cold hardy.

With the above in mind, here are some tips to protect your Tampa landscape from freeze and frost damage:

  • Determine if you should be protecting your plants from freeze, frost, or both
  • Identify the frost prone areas in your landscape; then identify which plants may need to be protected that are in the frost zone
  • For frost protection, cover the plants with burlap, quilts, or commercial frost cloth, or create a tent-like canopy with thin material such as tarps or sheets.  Denser cloth like burlap can rest on the plant leaf as frost most likely will not penetrate; thinner material like sheets will need to be "tented" over the plant, as frost will likely penetrate the fabric.  If necessary, anchor the material with clothes-line pins, or large book binder clips (to prevent covering from blowing off plants)
  • Turn off your sprinklers.   If plants are dry a few days prior to a potential frost or freeze, it is advisable to irrigate them, so that they are less stressed.   However, irrigating plants during a frost or freeze may actually damage the plants more by blanketing them with ice.  While that is appropriate for commercial fruit and produce growers, it is not for  a landscape.
  • If a severe freeze is predicted (below 32 degrees for more than 4 hours), the trunks of valuable plants, trees, and palms should be wrapped in blankets, as well as the canopy, to prevent trunk splitting.  Oak leaves, hay, mulch, or pine needles can be piled at the root system to prevent root kill.
  • Do not cut back or trim any damaged plants until spring.  The frost or freeze damaged plant material serves as a buffer for any future damage.  As well, trimming often promotes fresh growth that will be prone to additional frost or freeze die-back.
  • Do not leave protected coverings on for an extended period of time.  Quite often, after a frost or freeze event, our Tampa temperatures will climb to make for another hot and sunny day, and the covered plants can actually suffer from heat burn.
  • Throughout the rest of the winter season, continue to maintain your plants as normal, even if they look dead.  While you should not trim or fertilize, you should not let them dry out, so irrigate as needed.  Even if your plant looks dead, it probably isn't and you will be rewarded in the spring for your patience.

While this current frost and freeze forecast seems ominous, I would suggest that it may not be as bad at it seems.  Frost is predicted, but heavy winds should prevent it from settling, thereby minimizing damage.  As well, while freeze is a possibility in some areas, it is not likely to be for 4 hours or more.  Of course, weather predictions are just that, and not a certainty, so it is always best to be prepared.


fall-calendar

With our recent slightly cooler mornings, it can only mean one thing:  summer is drawing to an end.  And, with this year's heavy rains, our summer garden chores seemed to be so far from ever ending!  But, alas, they are, and it is with a wistful heart that I write today of the fall yard chores for your Tampa landscape.  Over the next few weeks, there are some end-of-growing season chores to do, to get your landscape ready for the winter.  Use this easy check list to see if you are done with your fall yard chores, or if you still have a few things left to do:

  • Fertilize plants and grass for the last time this year
  • Scout for scale insects on plants, and treat (you may need to do a follow up treatment in 10 days)
  • Scout for grub evidence in sod, and treat (look for areas that are thinned out or go into drought state easily)
  • Treat for weeds in your sod when temperatures fall below 85 degrees
  • Test sprinkler system, make adjustments and repairs.  Be prepared to reduce the amount of irrigation to be applied as temperatures drop
  • Add new sod or plugs to bare patches of St. Augustine, or top-seed with Rye Grass in Bahia
  • Replace summer annuals with winter annuals like Petunia or Pansy when temperatures are below 85 degrees
  • Install cold hardy plants in your landscape
  • Pull weeds in beds and spray weed control, if needed
  • Add fresh mulch to barren beds to help keep down weeds, retain moisture to the roots of plants, and protect cold sensitive plants at their root zone
  • Plant winter herbs and vegetables
  • Do a final trim or cut back of landscape plants
  • Trim palms, hardwood trees, and Crape Myrtles

I like to have all of these fall yard chores for Tampa landscapes finished by mid-November, with Thanksgiving weekend being the last marker date.  With that, you can rest easy, as your beds have their final going through, all plants and grass have fertilizer, insect control, and mulch.  the plants and trees are trimmed, and you can rest easy, to focus on family, holidays, and football!!!

Remember, as always, we will be happy to help you out with any of these chores, with either free advice and know-how, or free estimates to do the work.


over-watered-plants-with-root-rot

With this season's heavy rainfall totals, your over watered plants can suffer from root rot.  While root rot is a more common problem with house plants, it can also be very prevalent in landscape plants that are growing in water saturated soils.

The primary cause of root rot on plants is poor drainage and over watering, basically causing the plants roots to sit in water for long periods of time.  An occasional event of heavy rains or excess watering is not enough to create a condition of chronically over watered plants that can suffer from root rot.  As well, more established landscape plants can tolerate longer periods of over watering more than newly installed plants that have not been able to establish a mature root system.

A healthy root system is vital to the life of your landscape or potted plant.  Healthy roots need oxygen to disburse water and nutrients to the plant in order for it to thrive and grow.  An over watered plant can suffer from root rot in two basic ways:  the available oxygen is pushed out by water, and as the roots sit in water, they will get "wet feet" or rot, similar to us if our feet sat in a tub of water for days and days.  As the roots start to die, they are unable to uptake water and nutrients, and the plant will eventually die.

An early symptom of root rot on a plant is yellowing leaves, which indicates that the plant is unable to draw up nutrients through it's roots.  An even more definitive symptom of root rot on a plant is leaf wilt, even though the soil is damp or has moisture.  This would indicate that the roots are unable to draw up water, because they are compromised and diseased.   In some cases, if the plant has value, a soil and root sample can be submitted to a lab for a pathology report, which would identify the particular type of root rot, and allow for potential chemical fungicide treatment.

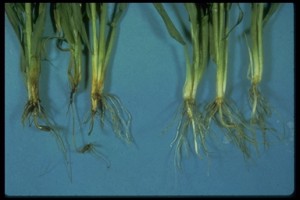
For most landscape and potted plants, though, a visual examination of the roots is sufficient to identify root rot.  A healthy root system is white and present, whereas a root dying from root rot is black, brown, or non-existent, or has necrotic lesions throughout (see image above).

Many times, root rot can be avoided in potted plants by following a few simple steps:  Always make sure that your potted plants are potted in a loose, well-draining soil; if you use a saucer to collect water under the pot, never allow water to "stand" in the saucer; water your potted plants only when the soil is dry to the touch about 1" under the surface; use plant "feet" if needed, to keep the bottom of the pot elevated; add rocks or broken pot shards to the bottom of the pot before soil is added to aid in drainage.

With your landscape plants, though, it can be a little more difficult to prevent root rot when Mother Nature is in charge of the watering.  You may not be able to avoid over watered plants, but you can use these general rules:  Only irrigate plants when the soil is dry 1" under the surface; select plants for typically damp areas that are more tolerant of "wet feet" conditions; install plants flush with the earth or slightly above, and do not mulch heavily against the crown of the plant; add gutters or drainage systems in areas that have chronically saturated soils; recognize the early symptoms of root rot and treat with a root fungicide when possible and feasible.

If you can recognize the symptoms of and the causes of over watered plants that can suffer from root rot, you can take steps to prevent it.

Stink Vine Invasive Landscape Weed

Stink Vine (Paederia foetida) is an invasive weed in Florida landscapes, and it can be extremely difficult to control.  It is a fast growing, aggressive vine that both crawls across the ground and climbs into trees and bushes, eventually blanketing all with it's dense root system, tendrils and foliage.

Stink Vine (also called Skunk Vine) was introduced to Florida from Asia in the late 1800's as a potential fiber crop.  It quickly adapted to our climate, and within 100 years of it's introduction to our state, it was named to the Florida Noxious Weed List.  As if it's growth habit wasn't bad enough, it emits a pungent odor when crushed, hence it's fitting name of Stink Vine, or Skunk Vine.

Stink Vine is easy to propagate, starting with a simple seed dispersed by wind or bird, or even a small cutting left behind when trying to remove it.  Once a seedling is rooted, It crawls across the ground with little notice, entwines itself on the trunks of bushes, A/C units, gas lines, or anything, and before you know it, it is everywhere.  Even in your grass.  As it crawls across the ground, it roots into the soil at it's nodes, which then spider out to create new vines, of which they then repeat the process over and over again.  If left unchecked, Stink Vine will eventually choke the life out of your landscape plants by covering the desired foliage and inhibiting photosynthesis.

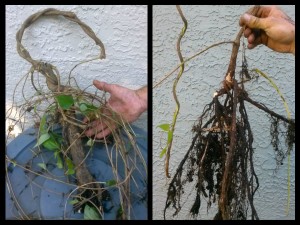
To control it, you must start with physical control....pulling it and tracing the vines back to the rooted tendrils and "mother plants".  Fortunately, the thin baby vines are white and easy to see, and they are rather tough, so they don't snap easily when pulled.  When you track them back to the source, you might find a larger trunk like the one in the above picture on the left.  If you can pull it, or dig it up with a hand shovel, try to get as many roots as possible, such as the photo on the right.  Once you are confident that you have pulled all of the runners, you can take a breather.  And, then wait for them to grow back, for your second wave of attack.

It won't take long for the new baby seedlings to emerge from the mulch or soil. It is at that point that you need to spray them with a weed killer that kills to the root.  Most systemic weed killers work by applying the herbicide to the leaf of the plant, so it won't serve any purpose to spray the tendrils or soil.  During our growing season of May-October, you may have to spray the weed killer several times, while watching for any runners that escape your attention and grow.  Those you will have to pull.

With a thorough initial clean up and removal of the Stink Vine, and follow up applications of a weed killer, you can control this insidious weed.  But, it does take diligence and perseverance!